


I have been painting with watercolours for over twenty years. I love the medium, now even more than when I started. In 2014 I felt the need to deepen my knowledge of how watercolour paints are created. I started experimenting with pigments and binder after reading and researching a lot of material on-line (see references at the end of this page).
The first handmade watercolour I produced was a Raw Sienna, a beautiful, ancient colour. I needed to make that colour because I could not find any single-pigment tube paint within my favourite brand Schmincke. I enjoyed the process and the high quality of the product so much that I slowly began to substitute all my favourite tube and pan colours into handmade paints. Today, I am using only my own handmade watercolour paints for all my paintings and there is no going back. I love them, they feel so smooth on the brush and on the paper, a real pleasure to use.
I decided to open this page so that other artists can find some reference and help in case they want to start making their own watercolour paints. And also to promote my work. I have concentrated here the information found scattered around the web to make high quality Artists' watercolour paints starting from 100% Pure Pigment and a pre-made watercolour Binder although from 2017 I started using my own handmade watercolour binder made with Gum Arabic, Honey and Essential Oil of Clove. I source the pigments from Schmincke, the German watercolour brand that has been making top quality watercolours since 1881.
Here is the list of the supplies I am using:

1. measuring spoons;
2. watercolour binder (from 2017 I started using my own handmade watercolour binder made with Gum Arabic, Honey and Essential Oil of Clove);
3. 100% pure pigments;
4. notebook;
5/6. spatulas;
7. distilled water;
8. plastic containers to store the paints;
9. glass muller;
10. glass slab.
STAGE 1 - PRE-DISPERSAL
Before adding the binder to the pigment, the latter must be pre-dispersed (mixed) with distilled water into a smooth paste. This will make the process of grinding the pigment with the binder easier and quicker.

I poured two teaspoons of pigment (Burnt Sienna in this case) on the glass slab and made a miniature volcano, in the middle of the crater I poured some distilled water and started mixing with a small spatula.

I added water until all the pigment was thoroughly mixed into a paste the consistency of toothpaste and then I started grinding with the glass muller.

As soon as I started grinding I could hear the pigment crackling under the muller. I ground the pigment paste for a while, until the mix felt smooth and no crackling sound was heard and with a spatula, I collected the pre-dispersed pigment on the centre of the glass slab.

A this stage the pre-dispersed pigment could dry out quickly so it is good to add the binder as soon as possible.
STAGE 2 - DISPERSAL
It took me a lot of experimentation and note-taking before balancing the perfect pigment-to-binder ratios, considering that they can vary from pigment to pigment. For Burnt Sienna, the ratio that makes a paint with the consistency that I prefer is 1 teaspoon of pigment to 3/4 + 1/16 teaspoon of binder.
I added the Schmincke watercolour binder (from 2017 I started using my own handmade watercolour binder made with Gum Arabic, Honey and Essential Oil of Clove) all at once.

And started grinding just after setting my timer to 1 hour. Watercolour paint needs a long grinding time and I never grind for less than one hour.

For the first 30 minutes the paint will feel rather thin and easy to work. I periodically recollect the paint to the centre of the glass slab and start grinding again.

After about 30 minutes the paint starts to slowly dry and thickens, making the grinding harder. At this point, to make my work easier I add a few drops of distilled water (NOT BINDER) and keep grinding.

I keep adding distilled water as I feel the paint is becoming too thick every 5 or 10 minutes. After one hour of grinding the paint should be very smooth and the consistency of firm toothpaste.

The paint is now ready to be stored in a container or in a pan.


This is my complete palette of ten handmade watercolours:

Top: Indian Yellow; Carmine; Prussian Blue; Burnt Umber; Raw Umber Greenish.
Bottom: Raw Sienna; Madder Red Deep; Ultramarine Blue Light; Burnt Sienna; Terra Pozzuoli.
I have developed this selection of colours over a number of years after researching the Old Masters' watercolour palettes. According to the artistic vision of the past 'sublime was the opposition of warm browns and cool blues' (The Great Age of British Watercolour 1750-1880). Also, the artist Francis Towne appreciated the 'blending of quiet, limpid tints: light red, yellow ochre, sepia, pale blue.' (Francis Towne, Lone Star of Watercolour Painting).
You can read Jane Blundell's review of my paints HERE
and D. Katie Powell's review HERE
and see a video/review from Sadie Saves the Day HERE
I have made so much paint that now I am selling my handmade watercolour palette on my on-line store, take a look HERE.


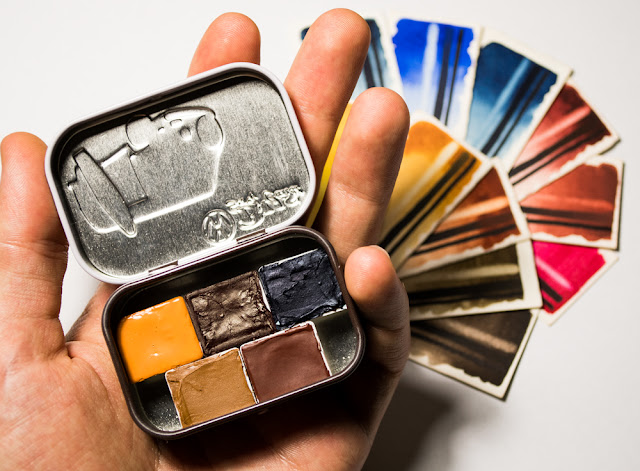
The following image shows the vast array of shades and hues that can be mixed with this selection of 10 colours:

I have developed this selection of colours over a number of years after researching the Old Masters' watercolour palettes. According to the artistic vision of the past 'sublime was the opposition of warm browns and cool blues' (The Great Age of British Watercolour 1750-1880). Also, the artist Francis Towne appreciated the 'blending of quiet, limpid tints: light red, yellow ochre, sepia, pale blue.' (Francis Towne, Lone Star of Watercolour Painting).
You can read Jane Blundell's review of my paints HERE
and D. Katie Powell's review HERE
and see a video/review from Sadie Saves the Day HERE
I have made so much paint that now I am selling my handmade watercolour palette on my on-line store, take a look HERE.


The following image shows the vast array of shades and hues that can be mixed with this selection of 10 colours:

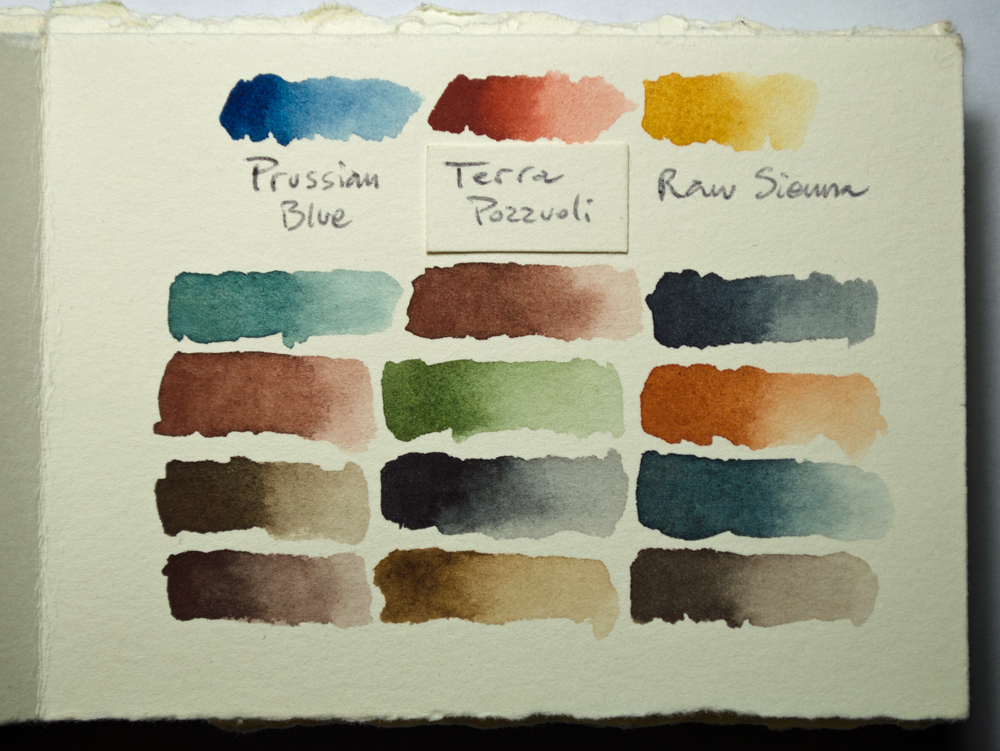
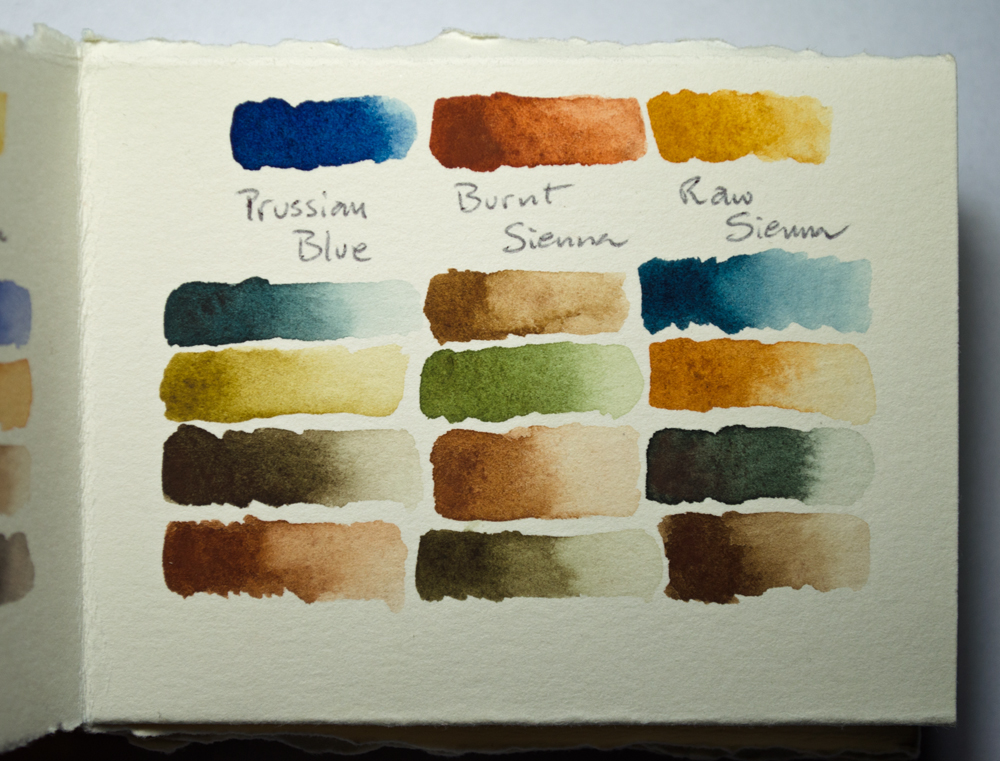
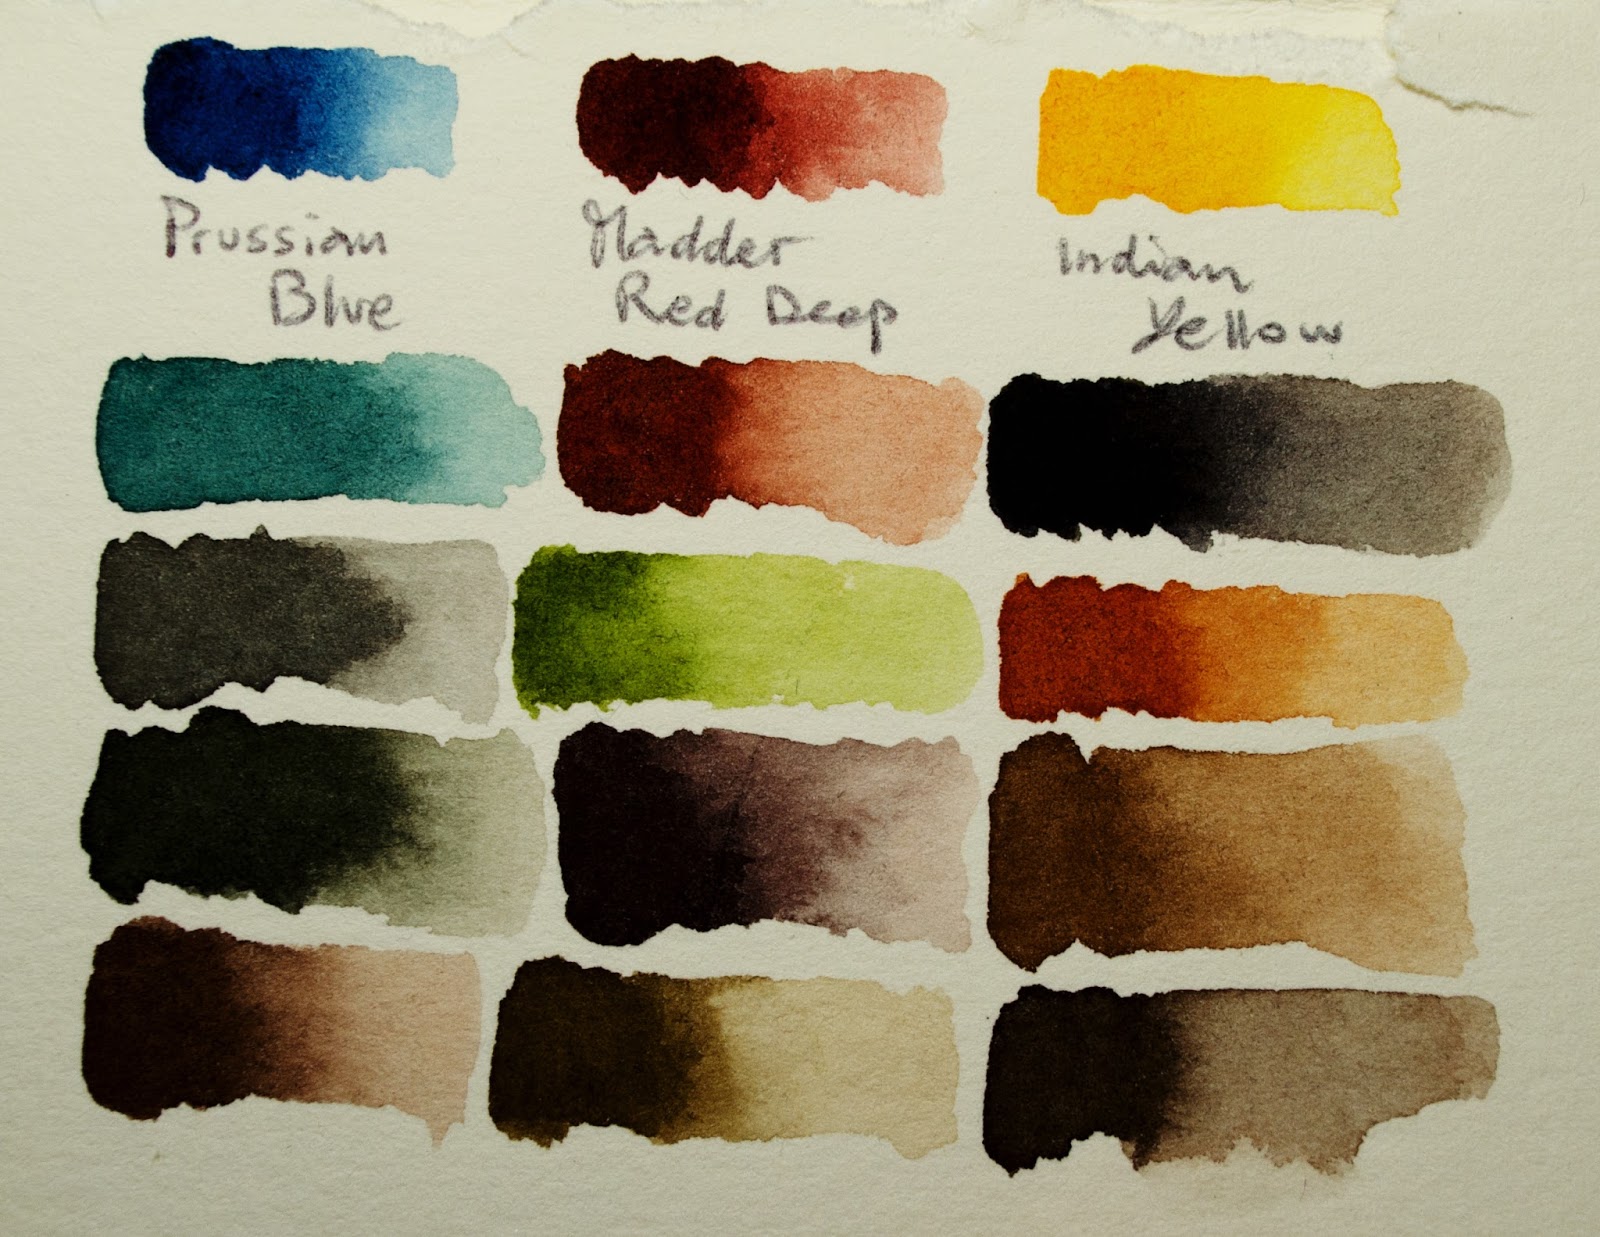
Following, I am listing a selection of some favourite triads and their mixing charts taken from my range of handmade watercolour paints:


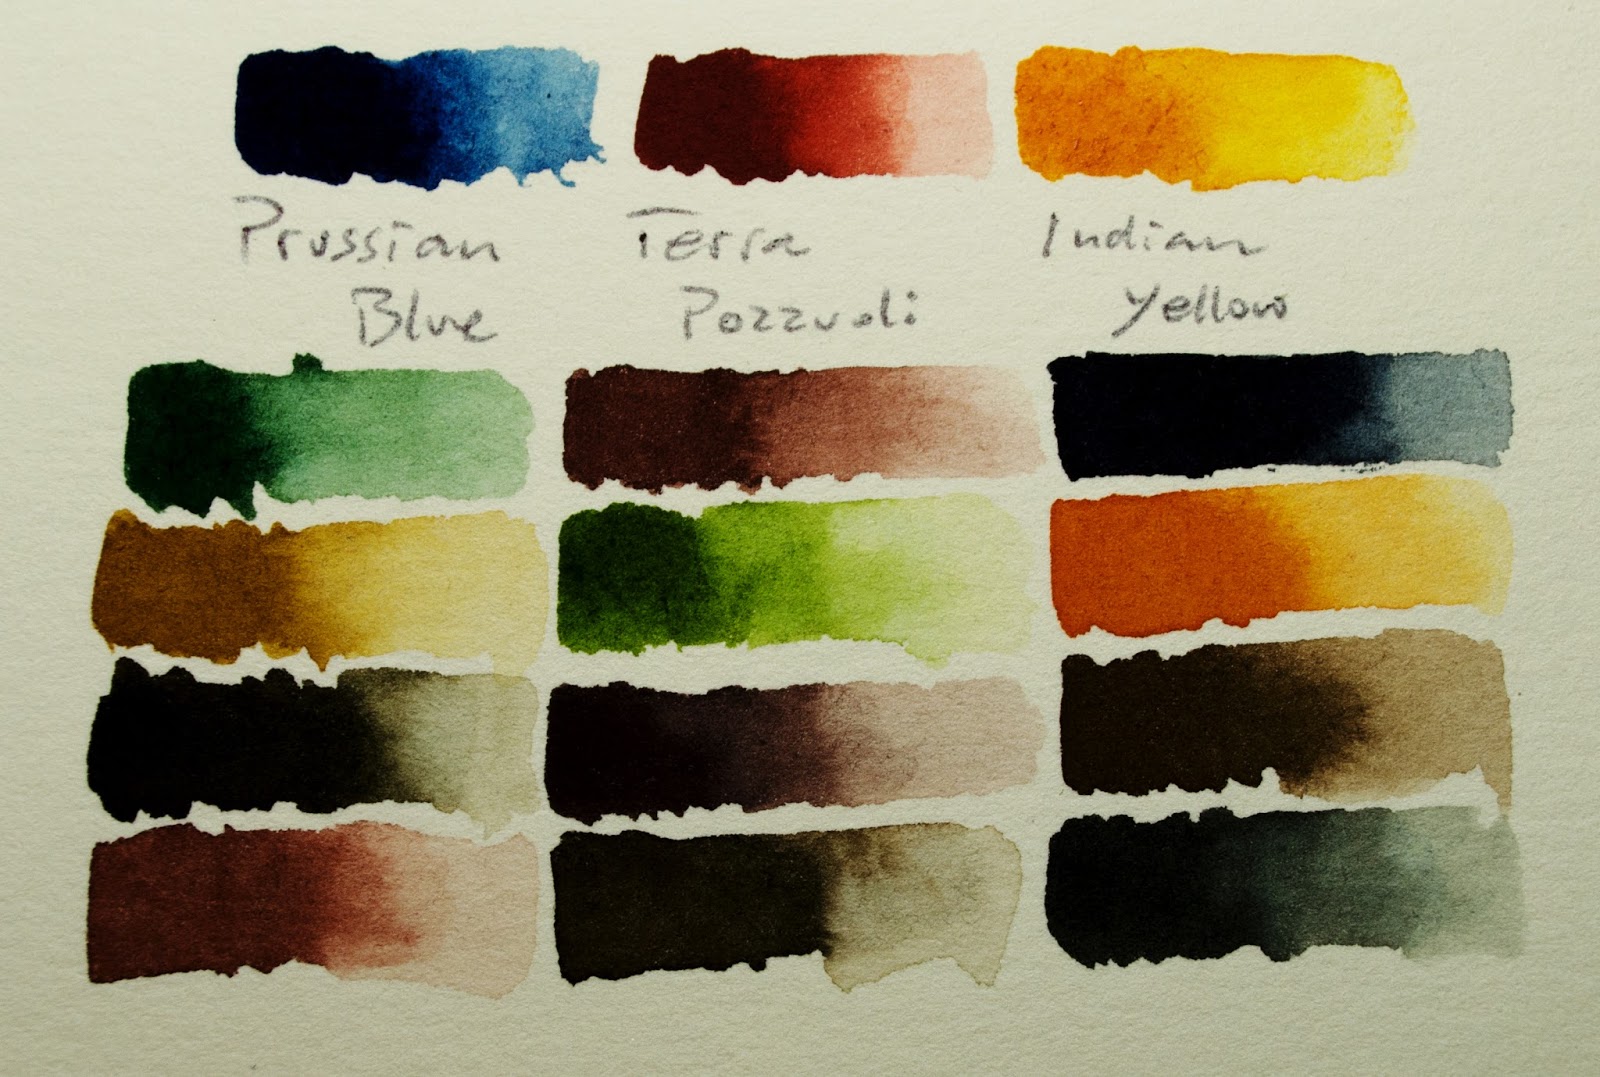


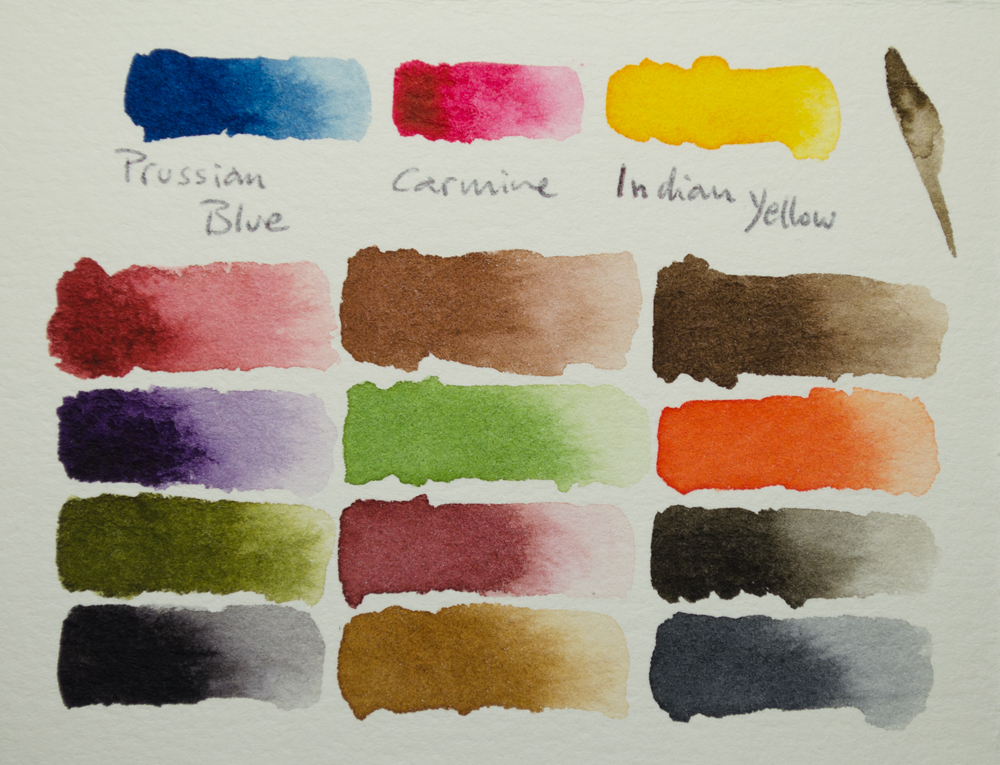

Following are some two-colour combinations that produce beautiful neutral shades.


I hope you enjoyed reading about the fascinating process of watercolour-making, I hope will find this page useful in case you decide to pursue this activity yourself. It takes a lot of dedication, patience and passion.
If you have any questions I'd love to hear from you, please leave your comments below or contact me at my email:
matteogrilliart@gmail.com
Follow on instagram
Thank you for reading.
References:
What a terrific explanation Matteo. It looks as though you are using a sheet of glass that is textured not smooth - is that to avoid grinding the pigment too finely or is it actually smooth and just the photos make it look textured?
ReplyDeleteThank you Jane, yes, one side of the glass slab is textured as is the flat, grinding side of the muller. The glass of both instruments needs to have a bit of a 'tooth' for better grinding. After making a few batches of paint the glass becomes smoother and I need to bring the texture back by grinding some silicone carbide medium grit powder and some water. There is so much labour behind the traditional handmade way of making paint!
ReplyDeleteThis was a fantastic tutorial, thank you so much Matteo! I know a lot of artists who will be interested in your process- I can't wait to share this post with them. Thank you for generously writing it.
ReplyDeleteYou're welcome Becca, thank you for reading!
ReplyDeletethis is amazing!! so glad I stumbled across your work - both paintmaking and painting. cheers
ReplyDeleteThank you Nicole, very kind of you.
ReplyDeleteWow, I am blown away by your skill and dedication to your art. Cheers Sri.
ReplyDeleteThank you Sri
ReplyDeleteComplimenti! Me lo studierà con calma!
ReplyDeletePosso condividerlo nel mio gruppo fb WORKING-MODE PALETTES? Grazie!
ReplyDeleteCerto Raffaele, scusa il ritardo.
Delete